
Templates
A template is an ordered list of prompts — a recipe you run instead of typing the same sequence of instructions again. Build the sequence once, and it becomes repeatable: for you tomorrow, and for anyone else on the same repository.
Templates are ordinary Markdown files on GitHub, with --- separating one prompt
from the next, so they can be reviewed and edited like any other file in a
repository. This page covers working with them from inside the workbench —
opening one, running it, editing its steps, and creating one from a conversation.
The panel that lists them is described in
Application chat.
Choose template
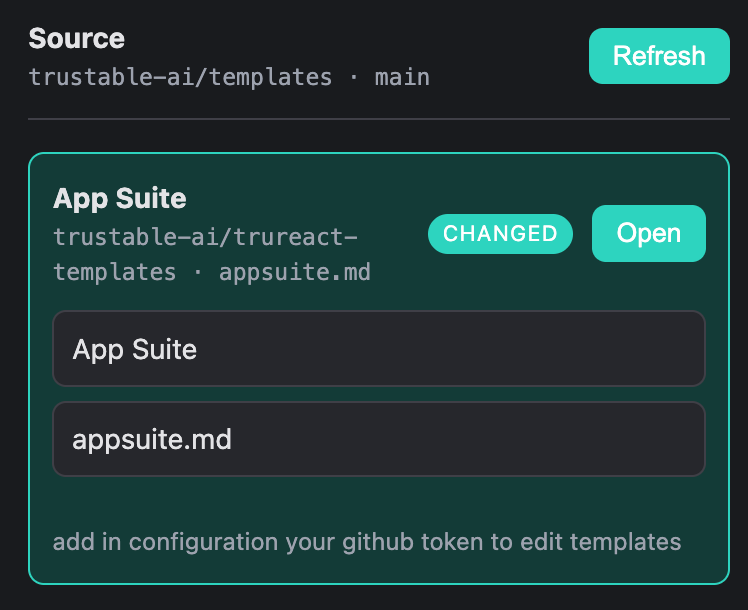
The top of the Templates panel shows two things.
Source — the repository and branch the catalog is read from, here
trustable-ai/templates · main, with Refresh to re-read it.
Below it, the working copy: the template currently loaded into your
application. It is a real file, template.md, at the root of your application’s
checkout — not a reference to a remote one. That is deliberate: a template
travels with the application, is committed with it, and is published with it, so
the recipe that built an application stays with that application.
The box names it (App Suite), records where it came from
(trustable-ai/trureact-templates · appsuite.md), and offers Open. When you
have edited it, two editable fields appear — the display name and the file
name — which is how a template is renamed.
The note “add in configuration your github token to edit templates” means only that saving back to GitHub needs a token. Everything else works without one.
Changed

The CHANGED badge marks a working copy that differs from the catalog version — you have edited, added, moved or removed a step.
The badge appears whether or not a GitHub token is configured, on purpose: it is how you find out your edits are local-only. Without a token they stay in your application; with one, a Save to GitHub button publishes them back to the catalog.
Saving checks that the file has not changed on GitHub since you loaded it. If someone else has pushed in the meantime, the save is refused rather than overwriting their work.
Open
Open loads the working copy into the conversation as a series of steps.
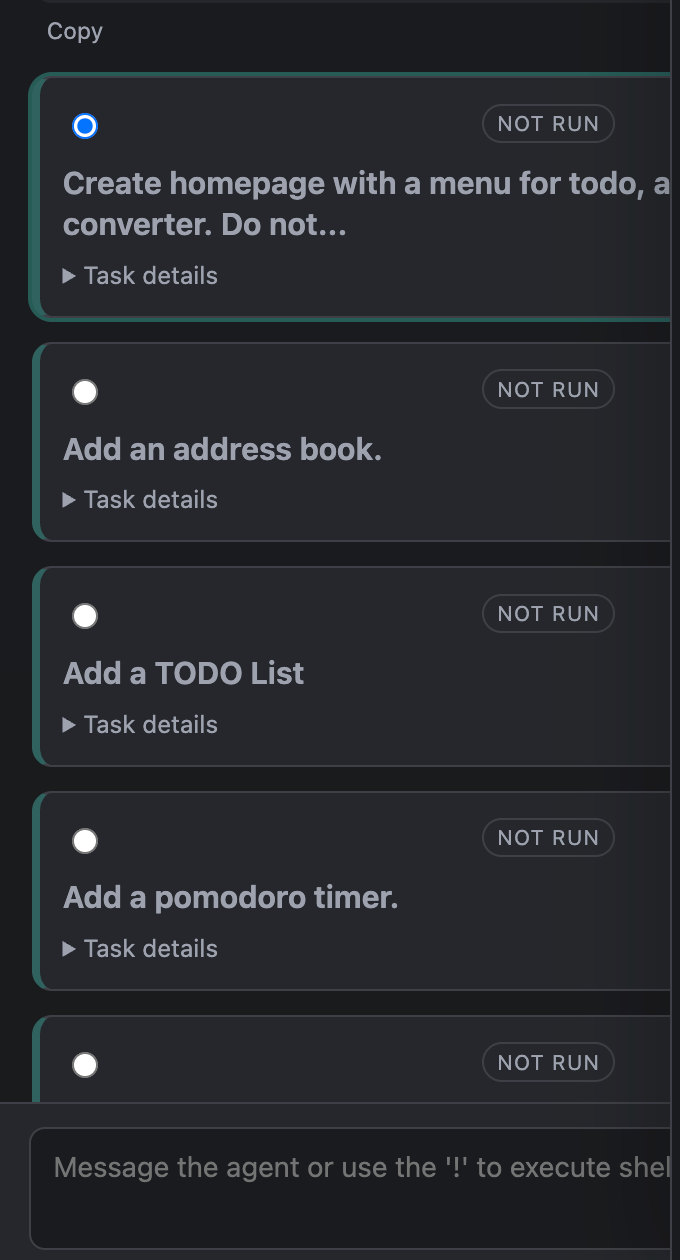
Each prompt becomes its own node. A node shows:
- a radio button marking the selected step — the one Run next will execute;
- a state badge: NOT RUN, RUNNING…, or RUN;
- a title, taken from the prompt’s first heading or first meaningful line;
- Task details, a disclosure holding the full prompt text.
The state is shown by colour and by name — muted for not run, amber for running, green for run — so it is legible regardless of colour perception. A step counts as run once it has produced output, which means the states survive closing and resuming the session rather than resetting.
The template above builds an application in stages: create the homepage with its menu, then add an address book, a TODO list, a pomodoro timer, and so on. Each step is small and checkable, which is exactly what makes the sequence worth keeping.

Expanding Task details shows the complete prompt. Titles are shortened for scanning; this is the text that actually runs, and it is worth reading before you run a template you did not write.
Note this one ends with “Do not implement the pages” — templates are often written to constrain the assistant as much as to instruct it, keeping each step to one reviewable change.
Run

Run the selected step — from the node’s own Run button, or from Run next step on the toolbar, which additionally advances to the following step.
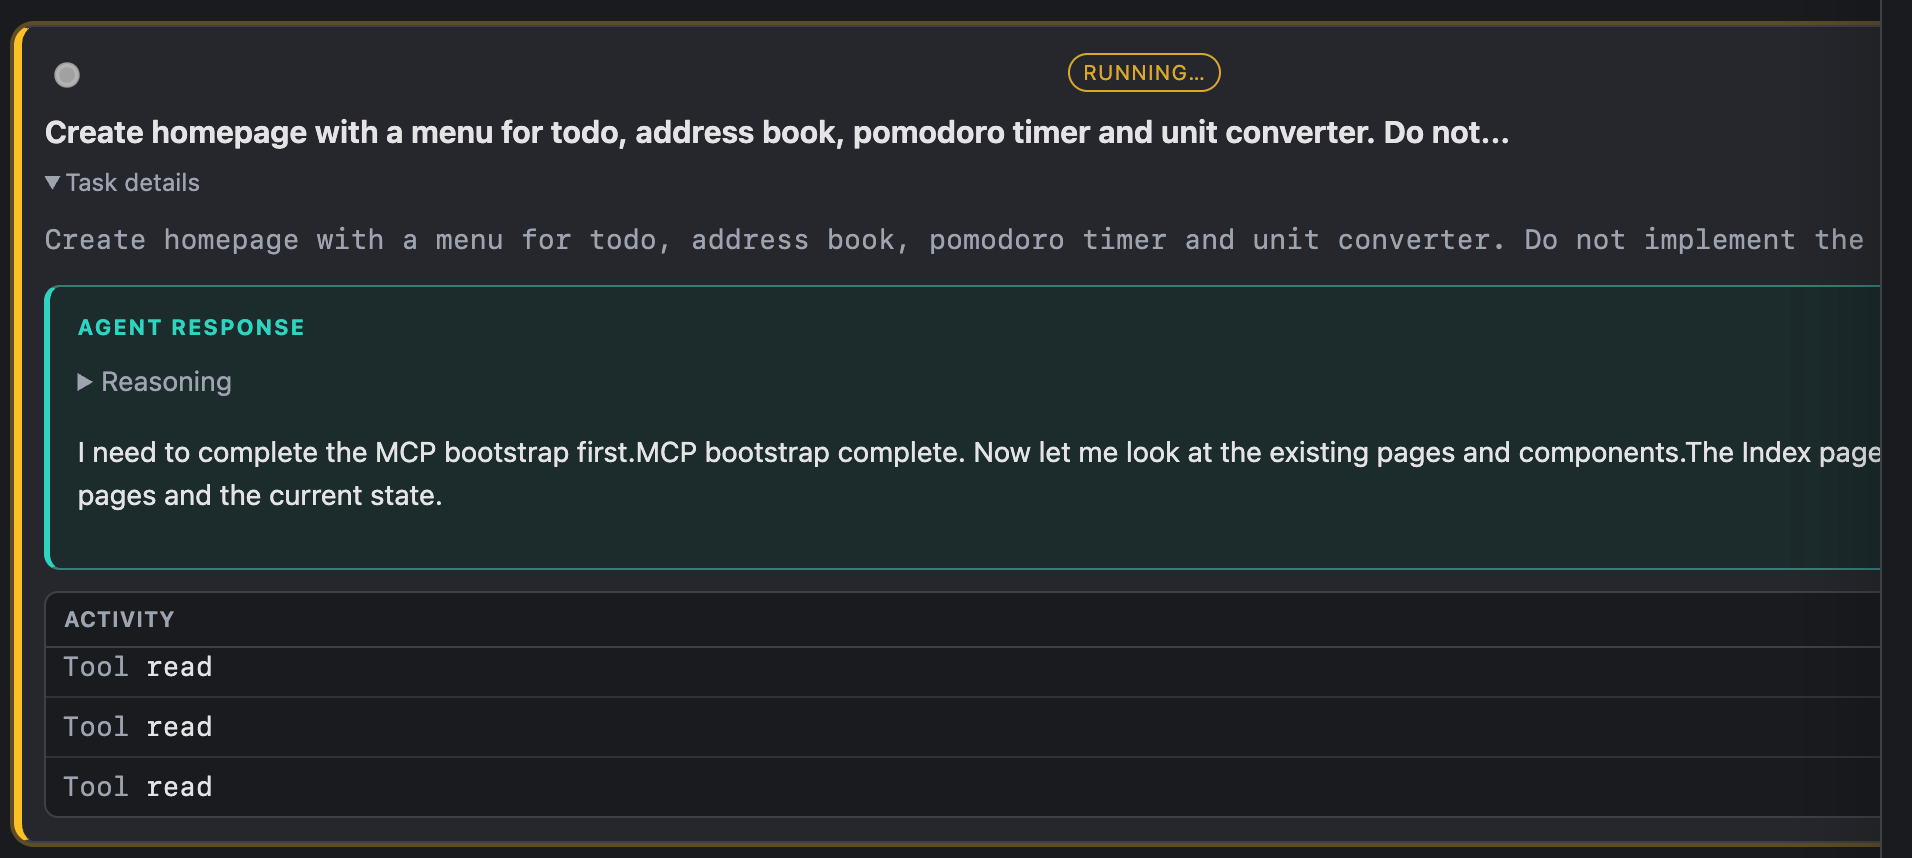
A running step streams its work directly below the node:
- the badge turns amber and reads RUNNING…;
- AGENT RESPONSE carries the assistant’s output, with its Reasoning available under a disclosure — here it works out that the pages already exist and decides to replace them with placeholders, because the prompt said not to implement them;
- ACTIVITY lists the tool calls as they happen (
Tool read,Tool write, …) in a small scrolling window that follows the latest one while keeping the whole history.
The response is what you read; the activity is what you check when the response surprises you.
Run all steps runs everything from the current selection to the end. Steps run strictly one at a time, since they share a single session. Two behaviours are worth knowing: each prompt is re-read when it executes, so an edit you make mid-run is the version that runs; and a failed step ends the run rather than firing the remaining prompts into a broken state.
The composer’s Stop button aborts the whole run, not just the current step, and leaves the selection on the step that was stopped — so Run all steps resumes from there rather than starting over.
Menu specific template

Each step carries four controls: Run, Edit, Move and Remove. Together they mean a template is not something you can only consume: you adjust it in place, in the conversation, and the working copy is rewritten as you go.
Edit


Edit replaces the node’s body with a prompt editor, in place, and swaps Run/Remove for Save and Cancel.
Save commits the new prompt text, marks the template changed and writes the working copy. It does not run the step — running stays with the Run controls, so you can revise a whole template before executing any of it. Cancel discards the draft.
Editing one step does not block the rest of the conversation: you can still send an ordinary message while a node is open for editing.
Move

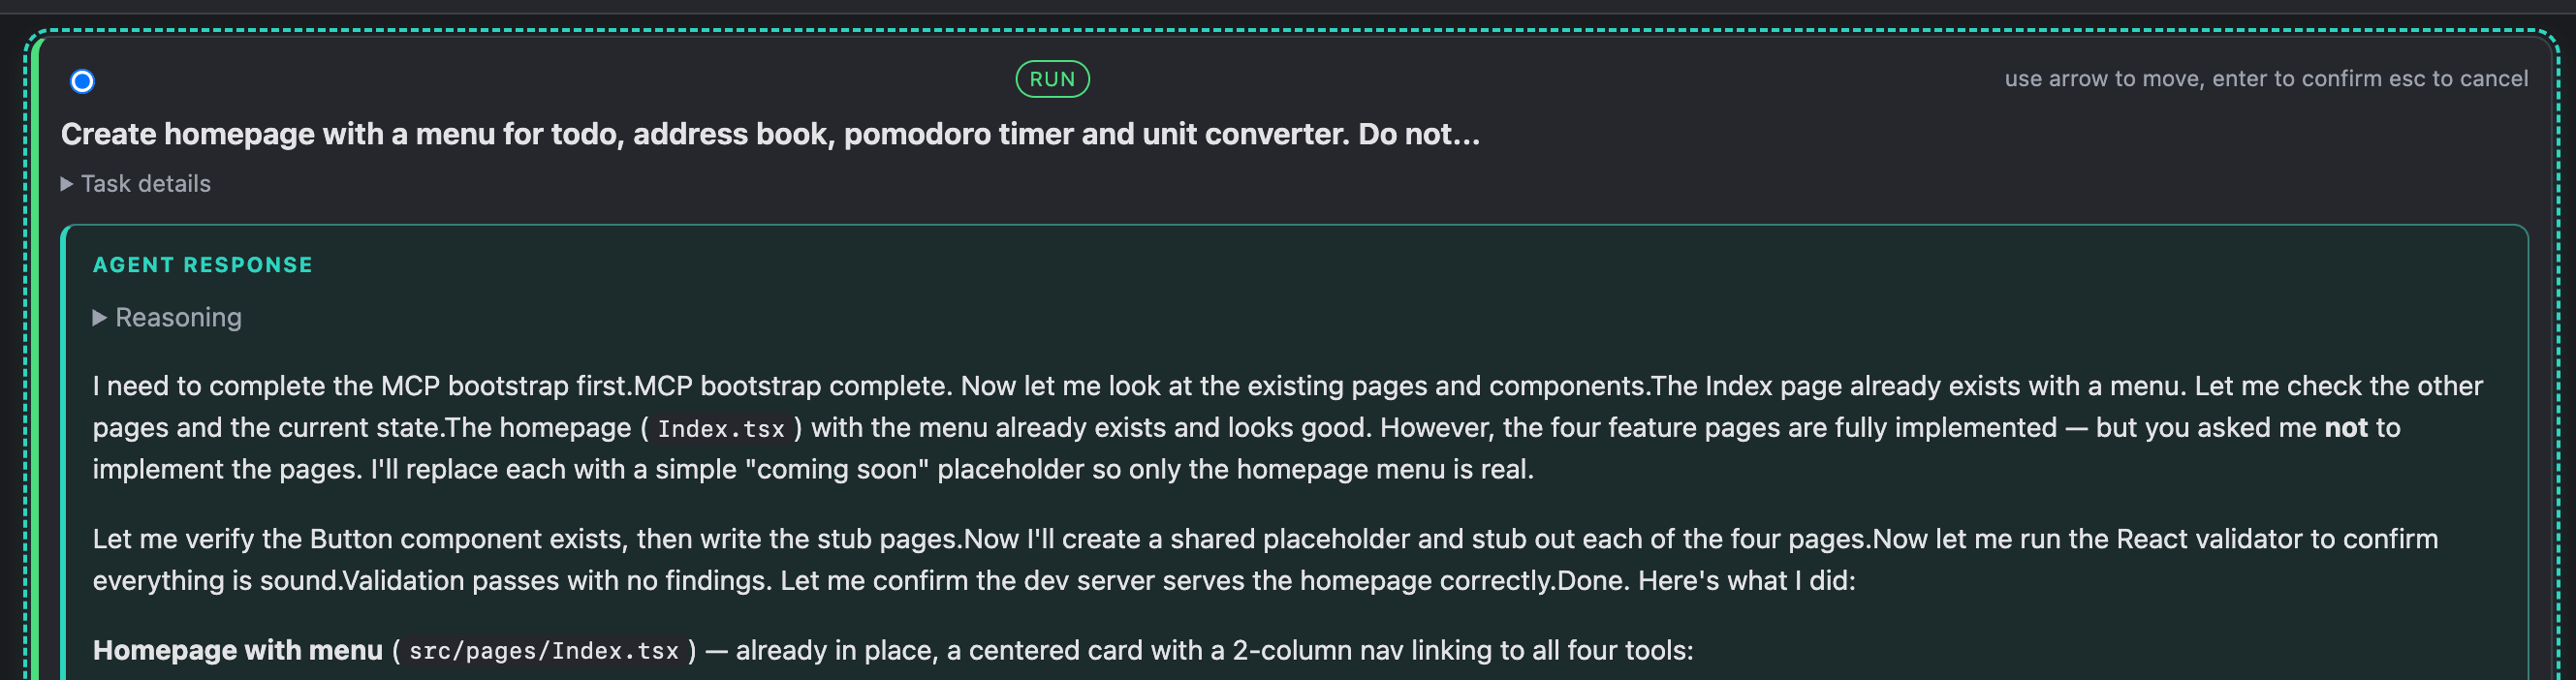
Move reorders a step, and is keyboard-driven: the node’s controls are replaced by the hint “use arrow to move, enter to confirm esc to cancel”.
- Arrow keys move the step one position at a time, so you see the new order as you choose it.
- Enter commits it and writes the working copy.
- Esc restores the order as it was when you started and writes nothing.
Only Enter writes, which is what makes Esc a true cancel rather than a second edit. Edit and Move are both modal on a single node, so starting one ends the other, and neither is offered while a step is running.
Remove
Remove deletes the step from the template. Like the other edits it changes the working copy in your application; the catalog version on GitHub is untouched until you explicitly save.
Creating a template from a conversation
There is deliberately no “new template” form. A template is created by promoting messages you have already sent — which means you write it by doing the work once, keeping the prompts that turned out well.

Type an ordinary message and send it.

While a template is loaded, your own messages appear as AD-HOC INPUT nodes. They run normally and stream their output, but they are not part of the template: they are inserted before the selected step, they do not advance the selection, and they are excluded when the template is saved.
They carry two controls of their own: Add to template and Remove.
Add to template — pinning — promotes the message into a real step. It gains the standard Run / Edit / Move / Remove controls and is included in saves. The assistant’s reply is carried across too, so pinning does not discard what the step produced.
With no template loaded the same action is labelled New template: the first pin creates a working copy, turns that message into its first step, and switches the conversation into template mode. You name it later, when you save.
This is the whole creation path — build something by talking to the assistant, pin the prompts that worked, and you have a repeatable recipe.
Remove discards an ad-hoc node without pinning it — for the messages that did not lead anywhere.
A green RUN badge marks a step that has already produced output, ad-hoc nodes included, so you can see at a glance what has and has not been done in this session.
Next
- Application chat — the assistant and the Templates panel.
- Configuration — pointing Trustable at your own template repository and adding a GitHub token.